How to Print a Google Sheet on One Page (Fit to Width)
Printing a spreadsheet often gives you a stray column on page two or tiny text. The Print settings screen in Google Sheets fixes both, and it only takes a few clicks.
Open the print settings
Go to File → Print or press Ctrl + P (⌘ + P on Mac). A preview appears in the middle and the settings on the right:
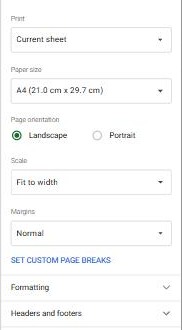
Fit everything on one page
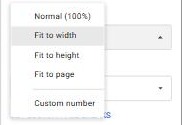
Open the Scale list and choose how to shrink the sheet:
| Option | Use it when… |
|---|---|
| Normal (100%) | The sheet is small and already fits |
| Fit to width | Columns spill onto a second page. All columns fit across; long tables still continue on more pages. Usually the best choice. |
| Fit to height | You want all rows on one page, however many columns there are |
| Fit to page | Everything must be on a single page, even if the text gets small |
| Custom number | You want an exact percentage, like 80% |
For wide tables, also switch Page orientation to Landscape.
Print only part of the sheet
Select the cells first, then open File → Print and set Print to Selected cells. The same list lets you print the Current sheet or the whole Workbook.
Tidy up the printout
- Gridlines: under Formatting, untick Show gridlines for a cleaner page.
- Repeat the header row: freeze the header row first; under Headers and footers, Sheets can repeat frozen rows at the top of every page.
- Page numbers: tick Page numbers under Headers and footers.
When the preview looks right, click Next to open your browser's print dialog, where you pick the printer or Save as PDF.
Frequently asked questions
Why is there a blank page at the end?
Some cell outside your table has content or formatting, often a stray space. Print Selected cells instead, or clear the extra cells.
How do I choose where pages break?
Click Set custom page breaks in the settings and drag the blue lines to where you want each page to end.